
Page History
...
| Section | ||||||||||||||||||||||||
|---|---|---|---|---|---|---|---|---|---|---|---|---|---|---|---|---|---|---|---|---|---|---|---|---|
|
Configuring the Intellect/Axxon Next server
The mobile client has two modes of operation: RTSP server and RTMP. The mode is selected in the mobile client settings.
To transfer video from the Android device camera to the Intellect/Axxon Next server in the RTMP mode, do the following:
- Make sure that the Java Runtime Environment and Node.js. are installed on the Intellect/Axxon Next server.
Download and install the livestream_setup.exe distribution kit with the Livestream and rtmp2rtsp services. The default services installation directory is C:\Program Files (x86)\Livestream.
Info title Note The Livestream service creates several virtual ONVIF cameras that are added to the Intellect/Axxon Next server configuration. The rtmp2rtsp service receives the RTMP stream, then converts it to RTSP and directs it to the server's virtual ONVIF camera.
After you install the services, you can set the following parameters using the Windows system variables:
Code Block LIVESTREAM_ONVIF_COUNT \\ number of virtual ONVIF cameras, default = 5 LIVESTREAM_ONVIF_PORT \\ port of the first virtual camera. All other cameras receive the port in order, default = 1961.
Note title Attention! - The specified ports should not be blocked by a firewall.
- To apply the changes, it is necessary to restart the services using the restart.bat batch file located in the services installation directory.
After you start the services, the livestream.out.log file will appear in the installation directory. This file contains url for each camera to send and receive video from the Android device, for example:
Code Block onvif device started at port 1961 onvif device url = http://host:1961/onvif/device_service push video to url = rtmp://host:1935/TOKEN/1961 video url = rtsp://localhost:1937/TOKEN/1961
- Manually add IP cameras to Intellect/Axxon Next and specify the following parameters:
- Type (manufacturer) - ONVIF 2.x;
- IP address - 127.0.0.1;
Port - the camera port number from the "onvif device url" string in the livestream.out.log file.
Info title Note For details about configuring IP cameras in Axxon Next see Adding and removing IP devices, in Intellect see Configuring IP devices.
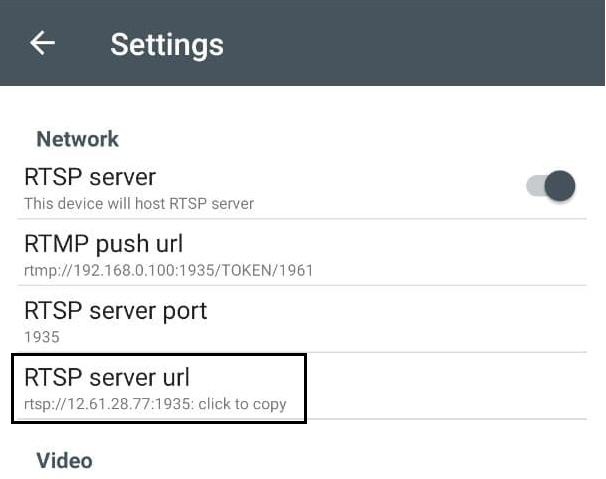
To transfer video from the Android device camera to the Intellect/Axxon Next server in the RTSP server mode, do the following:
- Create a video capture device operating over the RTSP protocol (for Axxon Next see Configuring connection of video cameras via RTSP, for Intellect see Configuring multimedia receipt using RTSP protocol).
- Specify the URL from the application in the settings of this device:
Configuring the Axxon Camera mobile client
- Go to the mobile application settings by clicking the
 button.
- In the Pushing service Network settings group, set the parameters as follows:
- In the URL field (1), specify the IP address of the Intellect/Axxon Next server.
in the Token field (2), leave the default value TOKEN .
Info title Note The application is authorized on the server with the default parameters: User=1, Password=1.
- In the Direct pushing settings group, set the parameters as follows:
Set the Force direct pushing checkbox (3) to disable interaction with the livestream service and use the default ports.
Info title Note This can be useful in case of problems with video streaming.
- In the URL field (4), specify the value of the "push video to url" string from the file on the livestream.out.log server.
- In the Video params group, set the parameters as follows:
- In the resolution back field (5) select the resolution of the main camera.
- In the resolution front field (6) select the resolution of the front camera.
- In the fps field (7) set the frame rate.
- In the bitrate field (8) set the bitrate of the video.
| Note | ||
|---|---|---|
| ||
To ensure the correct operation of the application, make sure the time on the Android device and the Intellect/Axxon Next server is synchronized. |