
Go to documentation repository
Page History
| Section | |||||||||||||||||||||
|---|---|---|---|---|---|---|---|---|---|---|---|---|---|---|---|---|---|---|---|---|---|
|
| Tip |
|---|
Installing the Client
| Note | ||
|---|---|---|
| ||
|
...
Add the repositories by sequentially executing running the following commands:
Code Block language bash echo 'deb http://download.axxonsoft.com/debian-repository stretch backports/main' | sudo tee -a /etc/apt/sources.list.d/axxonsoft.list echo 'deb http://download.axxonsoft.com/debian-repository weekly main backports/main' | sudo tee -a /etc/apt/sources.list.d/axxonsoft.list wget --quiet -O - "http://download.axxonsoft.com/debian-repository/info@axxonsoft.com.gpg.key" | sudo apt-key --keyring /etc/apt/trusted.gpg.d/axxonsoft.gpg add - && sudo apt-get update
- If you use Ubuntu 20.04, Debian 11 or abovehigher, then install the mono-complete from the stretch repository:
Code Block language bash sudo apt-get install mono-complete -t stretch
Download the Axxon One Client installation package from the AxxonSoft website (the Client line in the Linux 64-bit.deb section).
Install the Axxon One Client by sequentially executing running the following commands:
Code Block language bash sudo dpkg -i axxon-one-client-bin*.deb || sudo apt-get install -f -y sudo dpkg -i axxon-one-client_*all.deb || sudo apt-get install -f -y
- During installation, it will be necessary to you must specify the maximum size of the log files in megabytes and the log level.


Info title Note Later you can change the specified value (see Configuring the logging parameters of the Axxon One Client in Linux OS). To do this, run the command:
Code Block language bash sudo dpkg-reconfigure axxon-one-client
Installation of the Axxon One Client in Linux OS is complete. When the installation is complete, the Client icon will be displayed in the application menu.
Running the Client
| Note | ||
|---|---|---|
| ||
|
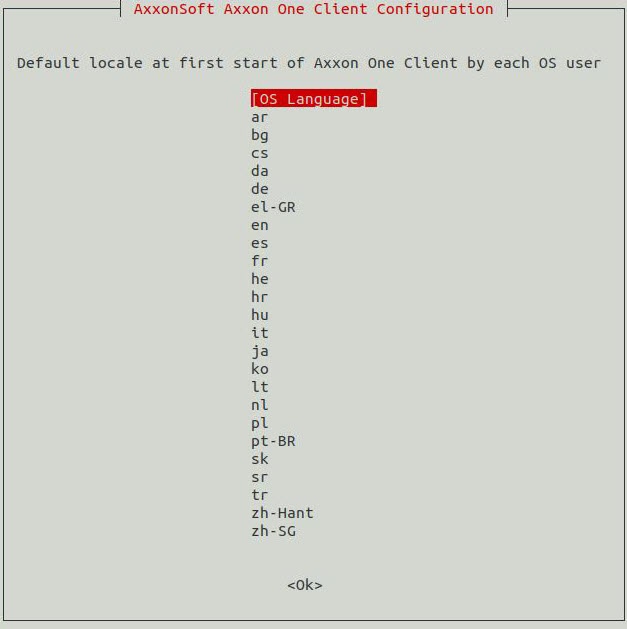
By default, at the first Client start, the OS interface language will be used. To change the language of the Client interface at the first start, do the following:
...
Run the command:
| Code Block | ||
|---|---|---|
| ||
sudo dpkg-reconfigure axxon-one-client |
Select the required language:
...
| title | Attention! |
|---|
...
.
...
Installing the Axxon One Client
...
without Server
On In Linux OS, you can install the Axxon One Client without installing the Server. To do this, do the folloiwng:
- Add repositories as described in the Installing the Client section.
- Download the set of archive with packages required to install the the Axxon One Client from the AxxonSoft website (the Client line in the Linux 64-bit.deb section).
The archive contains all necessary packages to install the Client:
Link for downloadingPackage name Description Required packages axxon-drivers-pack_%version.number%_amd64.deb DriversPack is required for IP devices support in Axxon One
https://www.axxonsoft.com/support/downloads/drivers-pack
trackeraxxon-detector-pack_%version.number%_amd64.deb Basic DetectorPack package includes onlyObject
detection, Service detection tools and basic Motion detectionhttps://www.axxonsoft.com/support/downloads/detector-packPackages for installing the Axxon One Client
Detection, Signal Detection, Noise Detection, Audio Loss, and Motion detection
axxon-one-core_%version.number%_amd64.deb To obtain this package, contact our technical support.
The Client installation packages
axxon-one-client_%version.number%_all.deb Client installation packages
https://www.axxonsoft.com/support/downloads/axxon-one-vms axxon-one-client-bin_%version.number%_amd64.deb Additional packages axxon-detector-pack-plugin-%name%_%version.number%_amd64.deb To use additional analytics packages, select and download the corresponding packages from the Add-ons and Linux 64-bit.deb lists
https://www.axxonsoft.com/support/downloads/detector-pack - Next, go Go to the folder with the downloaded packages archive and unzip those that are presented as a zip archiveit.
- Install DriverPack , DetectorPack and additional packages (if available) using and DetectorPack using the following command:
where instead of /home/user/Downloads it is necessary to specify the actual path to the packages.Code Block language bash sudo dpkg -i /home/user/Downloads/axxon-d*.deb || sudo apt-get install -f -y
Install the axxon-one-core_%version.number%_amd64.deb package using the following command:
Code Block language bash sudo dpkg -i /home/user/Downloads/axxon-one-core*.deb || sudo apt-get install -f -y
Install the Client packages using the commands described in the Installing the Client section up to the last step.
Installation of the Axxon One Client with no without Server on in Linux OS is complete.
Running the Client
| Note | ||
|---|---|---|
| ||
|
By default, at the first Client start, the OS interface language will be used. To change the language of the Client interface at the first start, do the following:
Run the command:
Code Block language bash sudo dpkg-reconfigure axxon-one-clientSelect the required language:
Note title Attention! - This setting must configured for each OS user separately.
- On the next launches the interface language can be changed in the Client settings (see Selecting the interface language).
Overview
Content Tools