...
- Go to the Additional settings tab.

- Configure the false alarm filtering:
- From the Neural network filter mode for "phantom" triggers drop-down list, select which operation mode of the neural network filter mode for "phantom" triggers (false detections that appear when the detector operates on empty areas of the frame) you want to use:
- Precise (default) works slower, puts more load on the system, but the probability of the "phantom" triggers is significantly decreased;
- Fast works faster, puts less load on the system, but the probability of the "phantom" triggers increases.
- In the Power of neural network filter for "phantom" triggers field, specify the filtering level of the monotonous or monochromatic triggers, for example, spots on the floor connected with lighting change in the range 0-100. The value of the parameter is selected empirically, the recommended (default) value is 8 for the precise mode and 0.3 for the fast mode. If you change the mode, the optimal value is set automatically.
- In the Power of filter for "phantom" triggers field, specify the filtering level of shadows and flares depending on the scene contrast, lighting change, presence of shadows and flares. The value of the parameter is selected empirically, the default is 1.
- Perform the advanced settings:
- In the Training period (s) field, specify the time in seconds during which the detector analyzes the scene. The longer the training process, the better the subsequent analysis. The recommended duration is from 15 to 30 seconds, 25 by default. The training quality depends on the "clarity" of the scene when the analytics is enabled: if the scene is noisy or the passenger traffic is too dense, we recommend increasing the period up to 5 minutes.
There are three modes of configuring the training period:- Automatically—automatic selection of the training period depending on other settings, equal to the -1 value;
- Manually—training period is set manually;
- Disabled—detector training is disabled. Equal to the 0 value.
- In the Post-training period (s) field, specify the time in seconds during which the detector "adapts" to the scene. If you disable the parameter, the false triggers can occur during the first minutes of the detector operation due to the algorithm peculiarity. It doesn't affect the quality of the subsequent analysis. There are three modes of configuring the post-training period:
- Automatically—automatic selection of the post-training period depending on other settings, equal to the -1 value;
- Manually—post-training period is set manually;
- Disabled—detector post-training is disabled. Equal to the 0 value.
- In the Frame sampling period (ms) field, specify the frame sampling rate for training in milliseconds. The default value is 67.
- In the Sampling rate [32, 256] field, specify the allowable margin of error for training results. The lower the value, the worse the training results. The recommended value is from 85 and greater. The default value is 128.
- Click the OK button to save the settings of the detector.
To save the
The Postprocessing tab
You can use this tab to configure object filters or object counting filters according to the option selected from the Detection filtering drop-down list in the basic settings of the detector.
Object filter
- To enable the object filter, select Object filter from the Detection filtering drop-down list in the basic settings of the detector.
- Go to the Postprocessing tab.
- From the Object filter list on the left, select one or more objects. When these objects are detected, the detector doesn't generate an event, and the event isn't displayed in the event viewer or on the screen.
 Image Added
| Info |
|---|
|
To remove the filter, click it again. |
- To apply the filter, click the Apply filter configuration button.
Object counting filter
- To enable the object counting filter, select Object counting filter from the Detection filtering drop-down list in the basic settings of the detector.
- Go to the Postprocessing tab.
- Click the Add count filter button. In the section on the right, select one or more object counting filters.
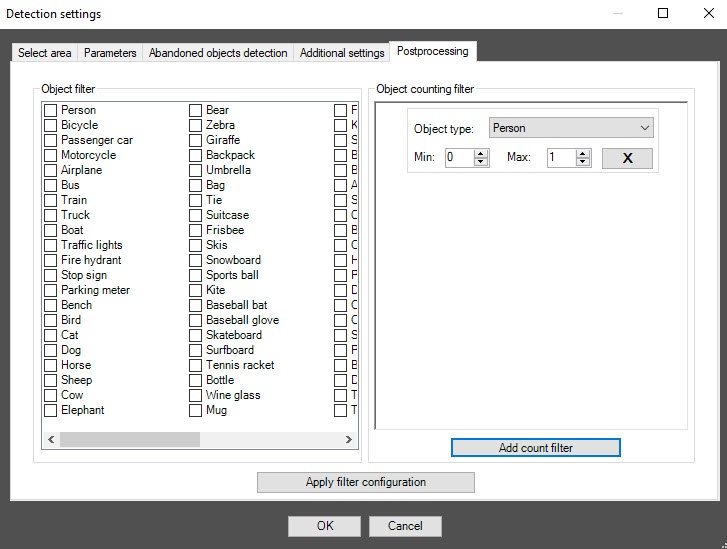 Image Added
- In the Min and Max fields, set the lower and upper threshold values for each object counting filter. If the number of objects of a given type in the detection area is within this range, the detector generates an event that is also displayed in the event viewer and on the screen. If the number of objects is greater or less than the set range, or there are no objects at all, then all events are filtered out and aren't displayed in the event viewer or on the screen.
| Info |
|---|
|
To remove the filter, click the cross to the right of it. |
- To apply the filter, click the Apply filter configuration button.
Click the OK button to save all settings of the detector. The Detection settings window closes, and you return to the detector settings panel.
To save all changes, click the Apply button on the settings panel of the VI abandoned objects detection object.
| Info |
|---|
|
One detector can use only one of two event filtering options during operation: either the object filter or the object counting filter. To enable debug logging mode in the VI SDK and collect detailed information about the configuration of VI detectors, use the ViDetectorDebug=1 parameter of the HKEY_LOCAL_MACHINE\SOFTWARE\WOW6432Node\AxxonSoft\PSIM\DetectorExt registry key (for more details, see the registry key reference guide in Vertical solutions; for information on working with the registry, see Working with Windows OS registry). |
...
