
Go to documentation repository
Page History
| Section | |||||||||||||||||||||
|---|---|---|---|---|---|---|---|---|---|---|---|---|---|---|---|---|---|---|---|---|---|
|
General information
In Axxon One, you can create and configure macros. You can create and configure macros on the Programming tab.
To create and configure macros, you must have access permissions to the programming setup (see Roles).
General algorithm to create and configure a macro
...
The Event rules and Cycle rules macros have a common algorithm of creation and configuration. To create a macro, do the following:
- Go to the Programming tab.
- Click the Create... button in the Event rules or Cycle rules list.

- In the Name field, enter the name of a macro. The default name is Macrocommand{sequence number}.
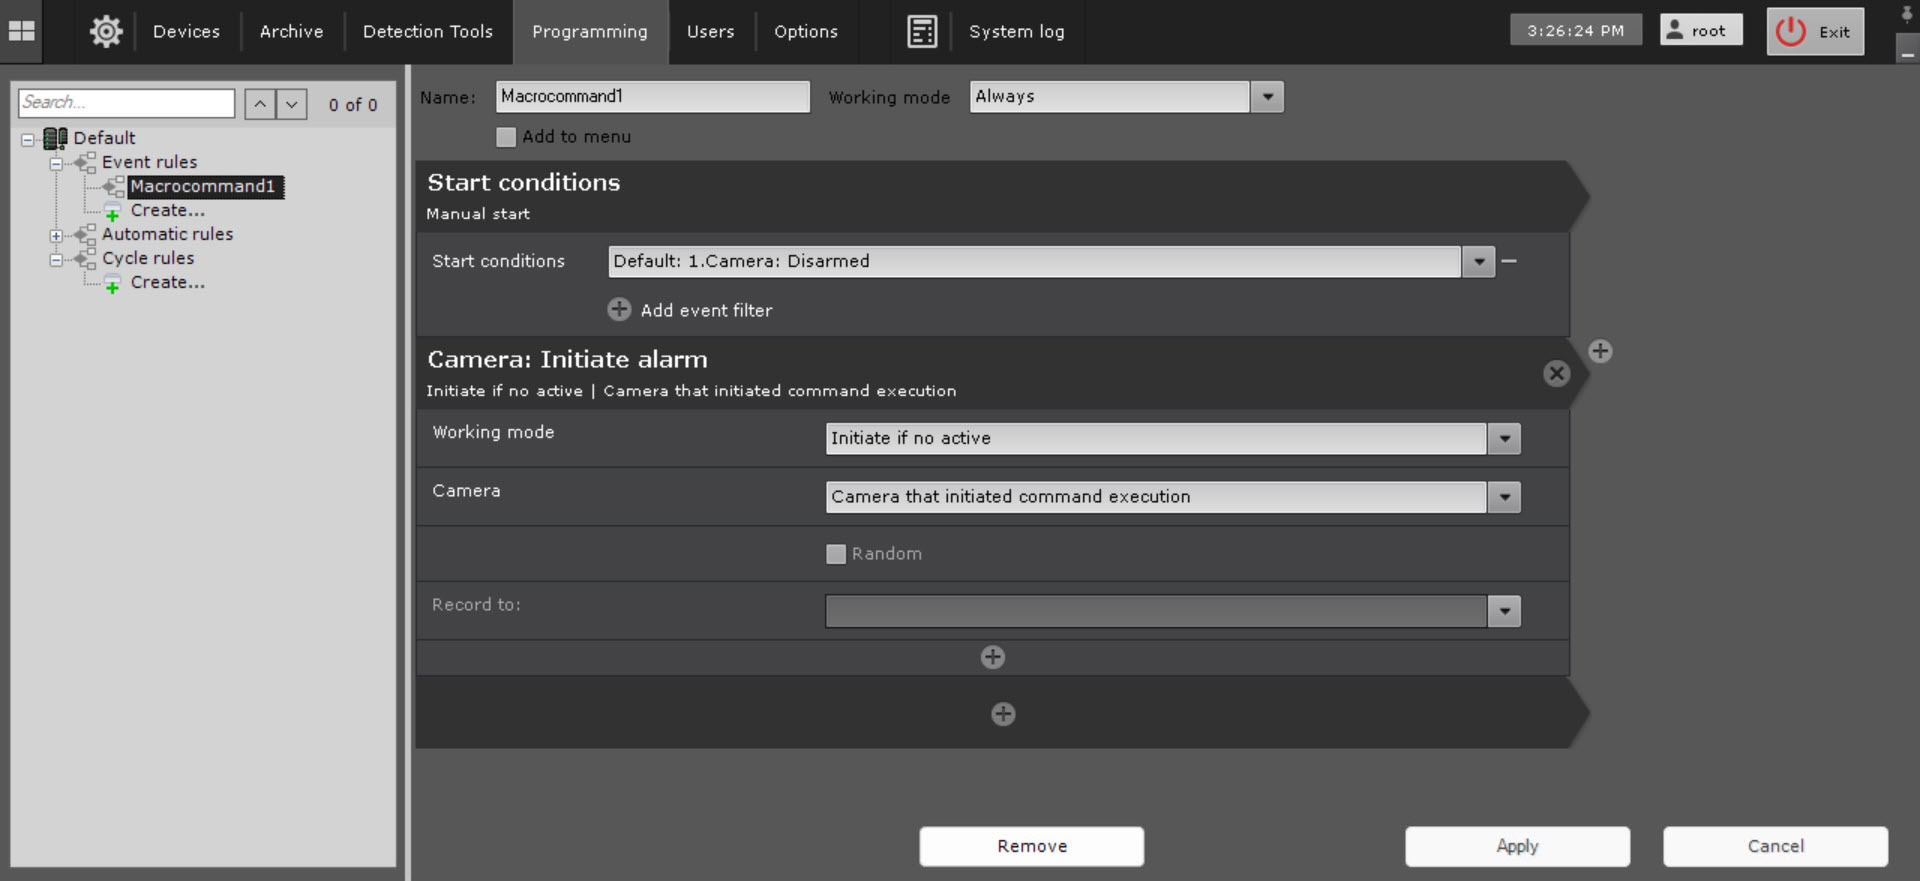
- From the Working mode drop-down list, select the working mode of a macro:
Working mode Event rules Cycle rules Never Can only be run manually - Enter the name of the macro (1).
(see Working with Dialog Board, Macros control) Disabled, manual execution is possible (see can be run manually (Macros control) Always (default) Runs always Runs always Always onTime schedule Runs within the selected time schedule (see Creating schedules). Manual execution is possible Can be run manually at any time Runs within the specified selected time schedule infoNote title NoteAttention! When creating If a macro
, the Always mode is used by default.working mode is within a time schedule (see Creating schedules), and a macro start time is outside this time schedule, a macro isn't started.
- If you need to add a macro to the control menu on the
- a layout (see Macros control), set the corresponding checkbox (3).To configure event-driven macros, click the
- Add to menu checkbox.
- For the Event rules macros, select one or more trigger events (4,
- events that initiate macro start by clicking the
 button in the Start conditions field (see Configuring start conditions). If you leave the event filter is left
 - blank, the macro can be executed
- you can start this macro only manually.
Info title Note - To delete an event from the filter, click the
 button.
 - You can run a macro for a group of cameras (see Creating a system of groups and subgroups).
- You can collapse macro start conditions and each action by clicking the header.
- To delete an event from the filter, click the
- Add one or more actions to the
- performed by a macro ( 5, see Settings specific to actions). Click the
- see Examples of macros). These are actions that the system must perform after an event occurs. To add an action, click the
 button. To delete an action, click the
  button.
 - Click the Apply
 button.
Select the macro working mode (2):

| Info | ||
|---|---|---|
| ||
The macro can be executed for a group of cameras (see Creating a system of groups and subgroups). |
| Info | ||
|---|---|---|
| ||
To hide the start conditions and action for the macro, click the action name. |
Created macros are displayed in the corresponding list. When you select the Never working mode for a macro, it is grayed out.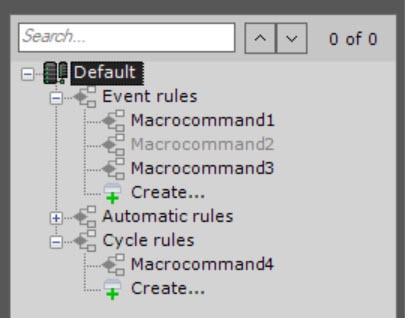
Features of configuring the Cycle rules macros
The Cycle rules macros can be run automatically in a specified time interval, or at a random
...
time within
...
a specified
...
interval. To configure this
...
behavior, do
...
the following:

- In the Heartbeat Interval
- Heartbeat interval field, specify the time interval in the HH:MM:SS format (1)
- . For example, if you set the interval to 8 hours and leave the Random checkbox clear (see 6b)
- , the macro will be launched
- a macro is started every 8 hours strictly
- hours strictly. The macro will be launched
- A macro is started according to cycle settings even if the actions from its previous launch
- start are not completed. In this case, several instances of the same macro will be
- are executed simultaneously.
Info title Note Set the Random checkbox (2)Starting with Axxon One 2.0.12, the minimumallowed value of the Heartbeat interval field is 1second.
Set the Random checkbox, if you need to
launch the start a macro at a random moment
set specified by
the the Heartbeat interval
parameterparameter. For example, if the interval is set to 8 hours, then once every 8 hours at a random moment,
the macro will be launcheda macro is started.

| Note | ||
|---|---|---|
| ||
If the macro working mode is linked to a time schedule, and the launch time falls out of the schedule, the macro will not be launched. |
To save the macro, click the Apply button.
| Note | ||
|---|---|---|
| ||
By default, the created macros are available only to the users from the admin group (see Roles). |
Editing macros
To edit a macro, do the following:
- Select the required macro from the list.
- Change the macro settings if necessary.
- Click the Apply button to save the changes. Click the Cancel
 button to cancel the changes.
Editing a macro is complete.
Copying macros
To copy a macroThe created macros are displayed in the list. If the Never mode is selected for the macro, it is grayed out.
You can copy macros. To do it, do the following:
- Select the required macro to copy
- from the list.
- Click the
- the Create... button.
A new macro with the similar parameter will be createdMacro is copied.
| Info | ||
|---|---|---|
| ||
To create an empty macro with no parameters specified, select any of the common macros groups, and click the Create... button. |
Removing macros
To delete remove a macro, select it in the list and click the Remove do the following:
- Select the required macro from the list.
- Click the Remove
 button.
 - Click the Apply button.
Macro is removedbutton.
Overview
Content Tools