| Section |
|---|
| Column |
|---|
| | Panel |
|---|
| borderColor | #CCCCCC |
|---|
| bgColor | #FFFFFF |
|---|
| titleBGColor | #F0F0F0 |
|---|
| borderStyle | solid |
|---|
| title | On this the page: |
|---|
| |
|
|
Configuring Configuration of the VideoIntellect VI detection of crowd software module includes general settings and configuration settings: detection areazone, configuration parameters, and detection tool detector characteristics.
General settings of the detector
- Go to the settings panel of the VideoIntellect VI detection of crowd object , which that is created on the basis of the Camera object on the Hardware tab of the System settings dialog box window.

- In the Frames processed per second [0.0161, 100] field, enter specify the number of frames per second that the detection tool will process (1). With a minimum value of 0.016, the video image will be analyzed once per minute, with a maximum value of 100—once every one hundredth of a in the range 1–100 that the detector processes per second. The default value is 30.Set the Use GPU checkbox if it is necessary to use a graphics processor (NVIDIA GPU) when working with a neural network 12 (recommended). You can specify only a positive integer. If you enter a number outside the range 1–100, it is automatically changed to the nearest border value. If you leave the field blank, it automatically returns to the default value when you save the settings.
- Set the Show objects on image checkbox if it is necessary to highlight you want to outline the detection area zone with a red frame border on the Video surveillance monitor when a motion crowd detection event is generated in the prohibited area (3). The prohibited area detection zone is specified in the detection tool detector settings on the the Select area tab.
- From the Detection filtering drop-down list, select the filter that you want to use: Object filter, Object counting filter, Do not use filter (default). You can configure filters on the Postprocessing tab of the Detection settings window.
- Click the Configuration setup button (4). As a result, the detection tool setup window will open detector settings window opens.
The Select area tab
- In the Detection settings window, on the Select area tab, click the Stop video button to pause the video.
 Image Removed
 - To add a new detection zone, click on a free area of the video image (1) and use the mouse to determine its boundaries. The new zone will be added to the list to the right of the video image.
 Image Removed
 - By default, the entire frame is outlined with a red border as a detection zone. You can change the borders of a zone by clicking its number in the list on the right and highlighting it in blue color.
Image Added - To rename the To rename a detection zone, enter a new name in field 2the field to the right of its number. The new name will appear appears in the zone label caption on the video image.
change the boundaries of the detection zone using the mouse by clicking on its number in the list on the right, and the number of the selected zone will be highlighted in bluespecify only one detection zone. To delete a detection zone, click the |
 Image Removed
  Image Added button to the right of the zone name Image Added button to the right of the zone name |
(3). After you delete a zone, save and reopen the settings, a default zone is automatically added. If you specify an incorrect zone, it is automatically replaced with a default zone after you save and reopen the settings. |
- To save all changes, click the Apply configuration changes button (4).
- To start video playback, click the Start video button (5).
The Parameters tab
- Go to the Parameters tab of the detection tool detector settings window. This tab displays the parameters of the used configuration.
If you do not don't need to change the configuration, skip steps 2 and 3 and go to the next tab.
 Image Removed
 Image Added
 - To use the custom configuration, click the Load configuration from file button.
- In the standard Windows search window that opens, specify the path to the prepared configuration file in JSON format.
The Crowd detection tab
- Go to the Crowd detection tab.
 Image RemovedImage Added
 - In the Head size [0.3, 1100] field, indicate which portion field, specify in the range 3–100 what part of the video image height is the human head in the range 0.3–1 (1). The specified fractional value is rounded to an integer value when you switch to another field or save the settings. The default value is 3.
In the Occupancy field (2), specify in percent as a percentage the share of the detection zone area , which should that must be filled in order for the detection tool detector to record the beginning of the Crowd event. If the occupancy remains longer than the time threshold specified in the Reaction time field (3s) field, an the Crowd alarm event Crowd is generated on the detection tooldetector. The default value is 50.
In the Reaction time field (3s) field, specify in seconds the time interval after which an the Crowd alarm event Crowd will be is generated on the detection tool detector if the value of the Occupancy parameter (2) remains equal to or above the set threshold. If during the specified period of time the value of this parameter drops below the threshold value, then the time counting stops and the counter is reset to zero. The default value is 100.
In the Time between alarms field (4s) field, specify in seconds the frequency of the Crowd alarm event generation.
- Set the Background loading checkbox (5) if it is necessary to load the background of the video image; by default, the checkbox is clear.
- Set the Background saving checkbox (6) if it is necessary to save the background of the video image for the period of time specified in the Background saving period field. By default, the checkbox is clear.
- In the Background saving period (sec.) field (7), specify the period of time in seconds during which the background of the video image is saved. The default value is 0.
- In the Number of analytics streams field (8), specify the number of video streams that will be used for neural network analytics. The default value is 4.
- To save the detection tool settings, click OK.
- To save the changes, click the Apply button on the settings panel of the VideoIntellect detection of crowd object.
. The default value is 180.
- In the Number of analytics streams field, specify the number of video streams that are used for neural network analytics. The default value is 4.
The Postprocessing tab
You can use this tab to configure object filters or object counting filters according to the option selected from the Detection filtering drop-down list in the basic settings of the detector.
Object filter
- To enable the object filter, select Object filter from the Detection filtering drop-down list in the basic settings of the detector.
- Go to the Postprocessing tab.
- From the Object filter list on the left, select one or more objects. If these objects are detected in the frame, the detector events are filtered. The events aren't displayed in the event viewer and on the screen.
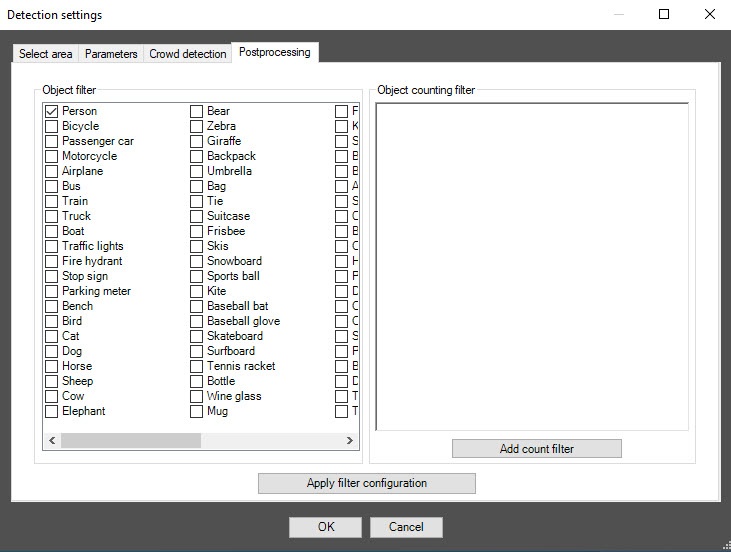 Image Added
| Info |
|---|
|
To remove the filter, click it again. |
- To apply the filter, click the Apply filter configuration button.
Object counting filter
- To enable the object counting filter, select Object counting filter from the Detection filtering drop-down list in the basic settings of the detector.
- Go to the Postprocessing tab.
- Click the Add count filter button. In the section on the right, select one or more object counting filters.
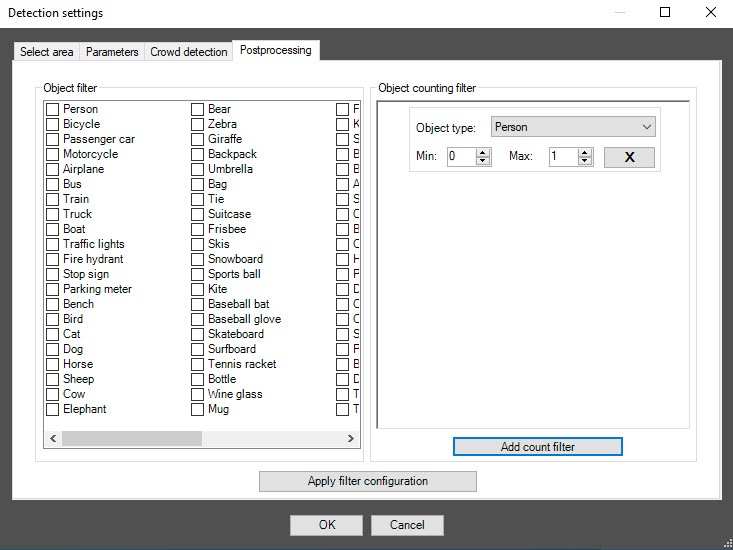 Image Added
- In the Min and Max fields, set the lower and upper threshold values for each object counting filter. If the number of objects of a given type in the detection area is within this range, the detector generates an event that is also displayed in the event viewer and on the screen. If the number of objects is greater or less than the set range, or there are no objects at all, then all events are filtered out and aren't displayed in the event viewer or on the screen.
| Info |
|---|
|
To remove the filter, click the cross to the right of it. |
- To apply the filter, click the Apply filter configuration button.
Click the OK button to save all settings of the detector. The Detection settings window closes, and you return to the detector settings panel.
To save all changes, click the Apply button on the settings panel of the VI detection of crowd object.
| Info |
|---|
|
One detector can use only one of two event filtering options during operation: either the object filter or the object counting filter. To enable debug logging mode in the VI SDK and collect detailed information about the configuration of VI detectors, use the ViDetectorDebug=1 parameter of the HKEY_LOCAL_MACHINE\SOFTWARE\WOW6432Node\AxxonSoft\PSIM\DetectorExt registry (for more details, see the registry key reference guide in Vertical solutions; for information on working with the registry, see Working with Windows OS registry). |
Configuring the VI detection of crowd module is completeConfiguration of the VideoIntellect detection of crowd software module is completed.
